Burst Those Wall Paint Bubbles and Blisters
Sam Lutz • April 14, 2015
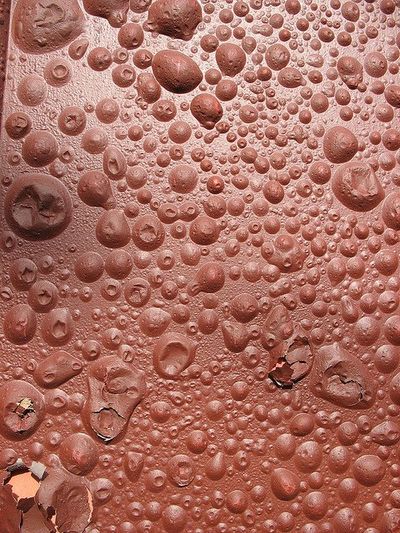
So, you’ve just painted your walls and you’re starting to notice a problem. Paint bubbles. You might see these paint bubbles in a concentrated area, or over a large portion of the wall. Don’t worry! There is a solution. This post will help you determine the cause of the paint bubbles and remove the problem once and for all.
Possible Causes
After painting your walls, bubbles may form in the paint for a variety of reasons.
- Lack of primer: Primer readies the surface to accept paint, ensuring a good bond. Although some paints will bond readily to a surface without primer, primer can prevent bubbles from forming if the paint being used is not compatible with the surface being painted.
- Moisture in the walls: Bubbles can form if the surface being painted is moist when the paint is applied.
- Oil and dirt on the surface of the wall: Presence of oil and grease, like that found on kitchen walls, can prevent the paint from bonding with the surface being painted.
The Proper Procedure for Removing Bubbles
This is the procedure that is most commonly recommended for removing paint bubbles in the wall. To start, you’ll need a putty knife or paint scraper, sand paper, cleaner, a couple rags, joint compound and primer. You’ll also need the same painting materials you used to paint the walls the first time around.
- Use the paint scraper or putty knife to scrape the paint bubbles off the wall.
- Sand down the area where the bubbles used to be until the area is smooth and the division between the paint and the wall is seamless.
- Clean the area that you scraped and sanded, removing any grease or dust from the wall.
- Use a joint compound to fill in any pits in the wall.
- Sand the joint compound to make the surface smooth.
- Re-clean after sanding to ensure that dust from the sanding is wiped away.
- Prime area that was just scraped and sanded. Wait for the primer to dry.
- Paint the area that was just primed.
- Wait for the paint to dry, then apply a second coat.
Alternative Solutions
Now that we’ve discussed the way that paint professionals fix paint bubbles, here are a few alternative methods to try.
- Do nothing. It’s not a cop-out. Some paint bubbles resolve themselves as the paint cures.
- Iron the bubbles out. Crazy as it sounds, this method is worth a shot before you scrape off all the blistered paint and start over. Turn on an iron and let it get hot. Don’t put water in the iron. Put the iron against the wall and hold it there for a period of 30 seconds to a minute. The iron will heat and soften the paint. Next, remove the iron and press on the bubbles with your fingers as soon as the paint is cool enough to touch without being burned. Manipulate the paint to press out the bubbles. You can see this process for yourself in this YouTube video:
Prevention
You’ve heard that Benjamin Franklin quote about an ounce of prevention being worth a pound of cure. The best way to deal with the paint bubble problem is to prevent the paint bubbles from forming in the first place. Prevention of paint bubbles requires proper surface preparation before beginning to paint.
- Clean the surface. Use whatever means necessary–whether that’s a duster, household cleaner or grease remover–to clean the wall before you paint. When you’ve finished cleaning the wall, buff it dry with a towel and then wait a little longer to let the let the surface fully dry before moving forward.
- Prime the surface before painting. Primer will ensure that the bond between your paint and the surface being painted is strong and secure.
For more information about paint bubbles–where they come from, how to prevent them and what to do about them–check out this helpful page
on the Benjamin Moore website.
If you do discover bubbles in your paint, the staff at Ace Paint and Unfinished Furniture
can help. We have all the tools you need to remove the paint bubbles (unless you’re looking for an iron). We can also help you figure out where your paint project went wrong, so you can stop the bubbles from forming a second time.

There are all kinds of wooden furniture: modern, antique and everything in between. We’ve talked about style differences, but what about how it’s made and what it’s made of? Is there a large difference between the wood furniture of today and yesterday?

Colors are so fascinating. They make us feel, they help us express how we feel. The right colors can really set the mood in a room, or on an outfit. There’s a lot to color theory and what each of the colors mean. This St. Patrick’s Day we thought it’d be fun to explore a little about green.

One of the wonderful things about good wood furniture is that it doesn’t have to be merely functional. It can be beautiful as well. We’ve seen some amazing pieces made with wood stains that are more than just furniture, they’re works of art. So if you’ve got an old table, desk or other piece of wood furniture that needs jazzed up, why don’t you consider using some of our great stains to try one of these ideas.

What's your furniture style? Here’s a few of the more popular styles and the kind of look they give your home.

Wood is our most basic raw material used for creating furniture. Wood furniture is timeless, and the aesthetic options are endless. Let’s talk about a few today, shall we?

The 2010s saw an uptick in modern interiors, bringing in clean lines to decor and furniture, so what does the new decade have in store? Restyle your home for the new year with the latest trends.

Are they bright and bold? Wild and wacky? It’s a thrill for our industry to learn what the latest “in” colors will be each year, and they never disappoint. The color trends for 2020 include shades of green, blue and pink, and each have an inherent welcoming quality.

Holiday parties are part of the magic of the season, but the cleanup is a pain—especially when furniture is involved. Prevent disasters with a few tips on how to protect your furniture during holiday parties.

The holiday season has arrived, and soon every corner will be decked out in red and green. But have you ever stopped to think about what holiday colors mean?

Restaining an old piece of furniture with a new varnish color can go a long way, but first you need to remove the old stain color.